Why do we need social login on website?
Social login provides easy and quick registration process. Customer can skip the long or complex registration process which enhance user experience. Furthermore, since registration process is required during checkout, it indirectly help to reduce cart abandonment. Besides, customer do not need to remember password when creating account on new site which reduce the login failures.
Table of Contents
Plugin used: Social Login & Register for WordPress by OneAll Social Login

Facebook and Google login setup guide would be explained using this plugin in this article.
First, install and activate the Social Login plugin from WordPress dashboard
Next, go to Social Login > Setup from left sidebar

Click ‘Click here to setup your free account’.
Create one OneAll account by input email, name and password then click ‘Signup for free’
After walk through the setup guide, copy and paste the subdomain, public key and private key from oneall dashboard to the social login setup page and click ‘Verify API Settings’ button.


Facebook setup
- Open business settings page, login your Facebook and select More Tools > Business Settings from left menu panel.

- Go to Apps tab under Accounts section
- Click the Add dropdown, Select ‘Create a new app ID’

- Select ‘Something else’ in Create an app prompt out and click ‘Continue’

- Fill out App display name and App contact email address and click ‘Create app’ button

- On Add Product page, choose Facebook Login and click ‘Set Up’ button

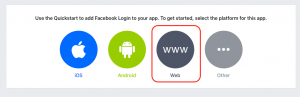
- Choose www (Web) as platform, enter domain of your website in Site URL field and click ‘Save’ button

- Go to Facebook Login > Settings from left menu panel and check the following settings:
Client OAuth Login: Yes
Web OAuth Login: Yes
Use Strict Mode for Redirect URIs: Yes - Copy the Valid OAuth Redirect URIs given to the field provided and click ‘Save Changes’

- Go to Settings > Basic from left menu panel, paste the privacy policy URL to relevant field, select Utility & Productivity from Category dropdown and click ‘Save Changes’ button.

- Copy and paste the App ID and App Secret in the fields below and click ‘Update Application Keys’
 You can see the notification of app keys have been updated after finish setup Facebook login in OneAll dashboard.

Google Setup
- Go to Social Networks > Configuration
- Choose Google

- Login your Google account or create one new account
- Navigate to Resource Manager
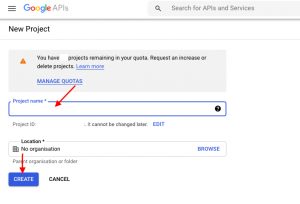
- Click ‘Create Project’ link on top of page

- Input Project name and click ‘Create’ button
- Select created project from top dropdown list

- Click menu icon on top left and go to APIs & Services > Library

- Search for Google People API in API library, select it and click on ‘Enable’ button


- Click menu icon on top left again and go to APIs & Services > Credentials

- Select OAuth consent screen from left menu panel, select ‘External’ for User Type and click ‘Create’ button

- Fill in App name and User support email.

- Click ‘Add Domain’ button under Authorized domains section, fill in Authorized domains, also email address under Developer contact information and click ‘Save and Continue’ button.

- Click on Credentials tab from left menu panel, click ‘Create Credentials’ link on top of page.
- Select ‘OAuth client ID’ from dropdown list

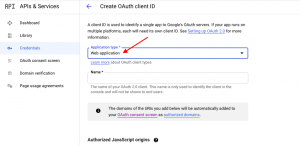
- In Create OAuth client ID page, select Web application from dropdown list of Application type field.
- Click on ‘Add URI’ button on both Authorised JavaScript origins and Authorised redirect URIs section
- Paste the URI provided and click Create button.

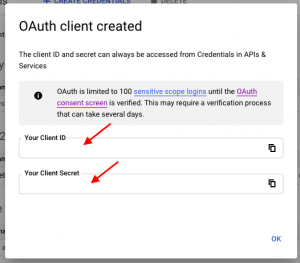
- Copy and paste the Client ID and Client Secret in field provided and click ‘Update Application Keys’
 You can see the notification of app keys have been updated after finish setup Google login in OneAll dashboard.

Congratulations! Now you know how to add social login to your website.