Adding a Webmail account to Microsoft Outlook is a convenient way to manage your emails in one place. Follow this step-by-step guide to configure your Webmail with Outlook:
Step 1: Collect Webmail Configuration Details
Before setting up your account, gather the following information from your Webmail provider:
Incoming Mail Server (IMAP/POP3): e.g., mail.yourdomain.com.
Outgoing Mail Server (SMTP): e.g., smtp.yourdomain.com.
Port Numbers:
IMAP: 143 (non-SSL) or 993 (SSL).
POP3: 110 (non-SSL) or 995 (SSL).
SMTP: 25 (non-SSL) or 465/587 (SSL).
Username: Usually your full email address.
Password: Your Webmail password.
Step 2: Open Microsoft Outlook
Launch Microsoft Outlook on your computer.
Click on File in the top-left corner.
Step 3: Add an Email Account
1. In the Info tab, select Add Account.
2. Enter your Webmail email address, Select “Let me set up my account manually”and click Connect.
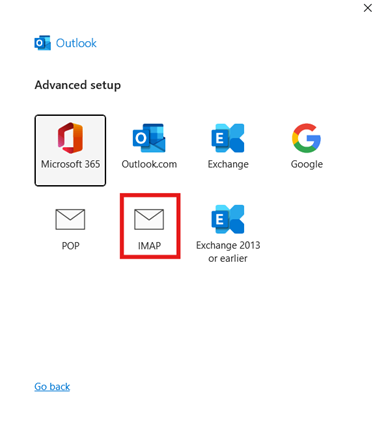
3. Click IMAP.
What are the differences between IMAP and POP?
IMAP: Ideal for accessing emails on multiple devices, as it keeps your messages synced with the server.
POP: Suited for downloading emails to a single device, with messages often removed from the server after download.
4. Enter your Password, Click Connect
Step 4: Configure Server Settings Manually
If Outlook doesn’t automatically detect the settings:
Enter the incoming and outgoing server details collected earlier. * Take Note: Make sure the Incoming mail Port is 993 and the Outgoing mail Port is 465.
Conclusion
By following these steps, you can successfully add your Webmail account to Microsoft Outlook and manage all your emails from one platform. Ensure you have the correct server details and port numbers for a smooth configuration process. Once set up, Outlook becomes a powerful tool for organizing and accessing your Webmail effortlessly.